Why Precision Matters in Baking
The Role of Accurate Measurements
Imagine you’re attempting a new sourdough recipe that requires exact proportions of flour, water, salt, and starter. Using a cup measure can introduce inconsistencies—different brands or how you scoop can affect the actual amount. A digital kitchen scale solves this by providing precise measurements in grams or ounces, ensuring every ingredient is measured exactly as intended. This accuracy is crucial because baking is as much a science as it is an art; the balance of wet and dry ingredients affects texture, rise, and flavor. When measuring by weight, you’re reducing guesswork and standardizing your process, leading to consistently delicious results.
Common Baking Errors Due to Inaccurate Weighing
Baking without a scale often leads to trial and error with disappointing outcomes. For example, an excess of flour from overpacking a cup can make cakes dry or dense. Conversely, too little flour creates batter that’s too thin, resulting in flat or rubbery baked goods. Inaccurate weighing can also disrupt chemical reactions—too much baking powder can produce a bitter taste, while too little may prevent proper rising. Many bakers have shared experiences of cookies spreading too thin or bread failing to rise due to inconsistent ingredient amounts. Having a reliable digital scale avoids these pitfalls by eliminating volume-based errors, giving you control over the results.
Choosing the Right Digital Kitchen Scale
Different Types of Digital Kitchen Scales
When shopping for a digital kitchen scale, you’ll encounter various designs. Some models are compact and portable, ideal for small kitchens or travel, while others offer larger platforms for bulky bowls or multiple ingredients. There are basic scales with straightforward functions, perfect for beginners, and advanced versions featuring nutritional information or multiple units of measurement for culinary enthusiasts. For instance, a home baker who frequently experiments with international recipes might prefer a scale that switches easily between grams, ounces, and milliliters.
Key Features to Look For
Beyond size and look, some features make a scale more user-friendly and versatile. The tare function is essential; it allows you to subtract the weight of your container, letting you measure ingredients directly in the bowl. A clear, backlit display helps in low-light situations, and a high maximum weight ensures the scale can handle large quantities of ingredients. Accuracy to at least one gram (0.1 ounce) is recommended for baking precision. Battery life and auto-off settings improve convenience. One baker shared that their touch-sensitive scale with a waterproof surface made cleanup effortless, saving time during messy recipes like chocolate ganache.
Price vs. Quality: Finding the Best Value
Price ranges for digital kitchen scales vary widely—from under $15 to over $100. While a higher price often correlates with extra features or improved durability, many mid-range scales offer excellent precision and reliability ideal for home bakers. For example, a frequently recommended model priced around $30 offers the essential functions with sturdy construction and good user reviews. Investing in a cheaper, flimsy scale may lead to inconsistent measurements and frustration, but an overly expensive model may include features you never use. Consider your baking habits and pick the best balance of price and quality for your needs.
Step-by-Step Process for Using a Digital Kitchen Scale
Preparing Your Scale Before Baking
Before you start, place your scale on a hard, flat surface to ensure stable readings. Remove any dust or residue from previous use. Power it on and check that the display is clear. It’s beneficial to have your ingredients and containers ready and within reach to minimize movement during measuring. One baker shared how organizing ingredients on the counter beforehand reduced errors and sped up the baking process.
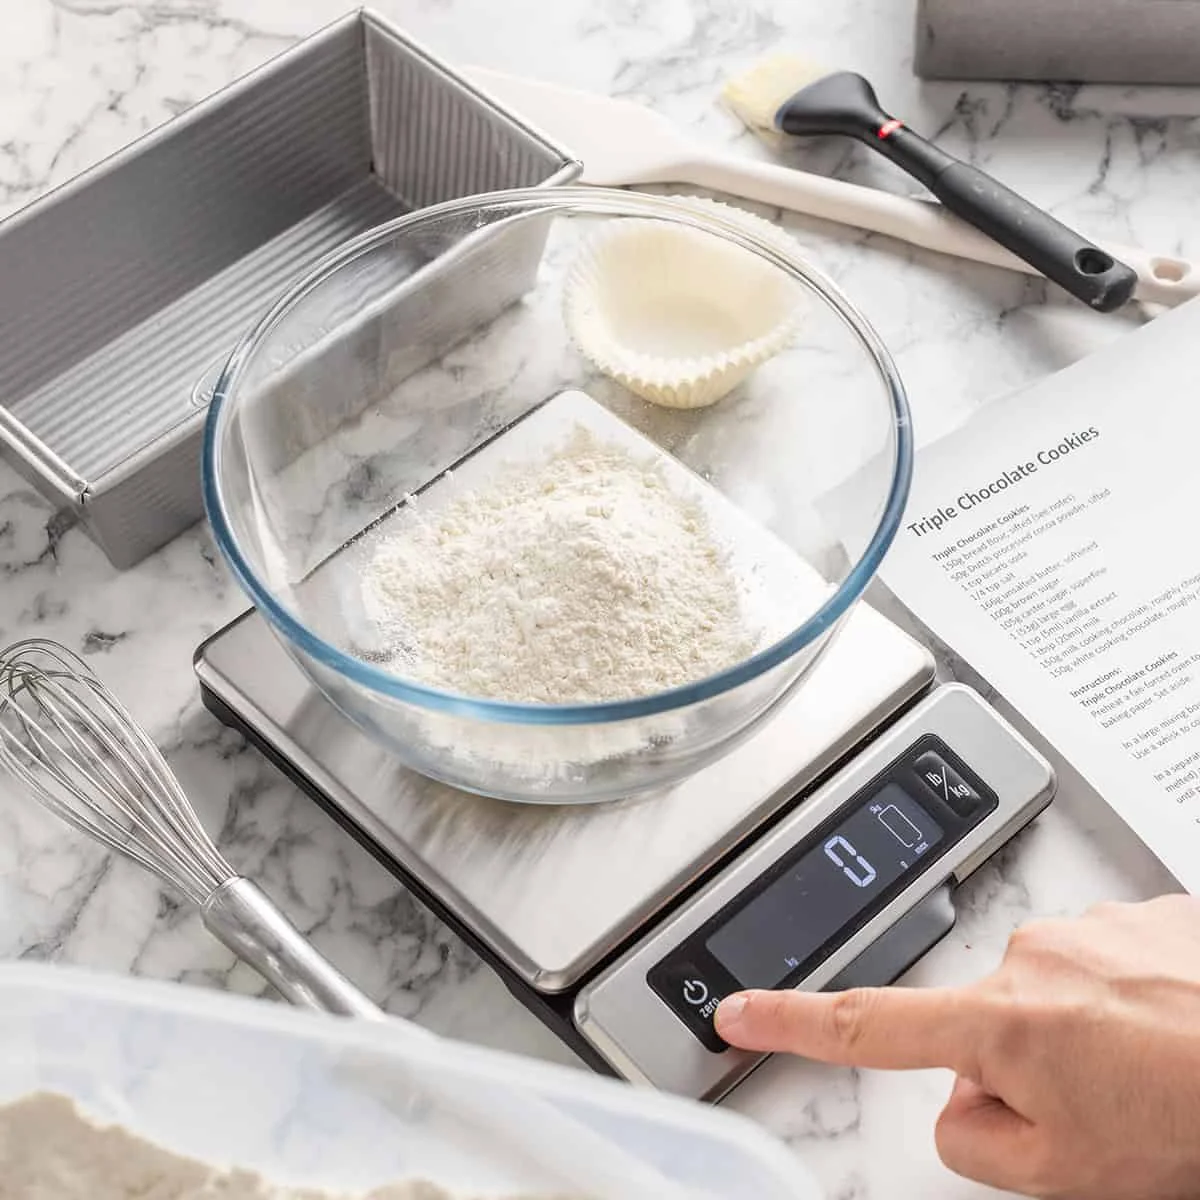
How to Tare and Zero the Scale
Place your empty mixing bowl or container on the scale. Press the tare button to reset the display to zero, effectively subtracting the container’s weight. This step allows you to measure only the ingredients you add. For multiple ingredients, you can tare again after each addition, cumulatively tracking the weight without transferring contents between bowls. This function is a game-changer in reducing dishes and simplifying recipe execution.
Measuring Ingredients Precisely
Add ingredients slowly until the digital display reaches the desired weight. For example, when measuring flour, spoon it lightly into the bowl rather than scooping directly to avoid compacting. After adding one ingredient, tare the scale for the next, repeating the process. Precision here ensures consistency; a slight difference in sugar or salt can drastically alter taste and texture. Many bakers recount that switching to weight measurements improved their baking success rate and confidence.
Tips for Weighing Sticky and Powdery Ingredients
Sticky ingredients like honey or syrup can prove tricky. Using a container lightly coated with oil before weighing can help release the substance cleanly. Alternatively, weigh the container beforehand and subtract the tare weight. For powdery ingredients such as cocoa or powdered sugar, it’s helpful to spoon them gently into the container without shaking or tapping, which can cause settling and inaccurate weights. Some experienced bakers even use small silicone spatulas to level ingredients without compressing them, preserving measurement integrity.
Maintaining and Calibrating Your Kitchen Scale
Cleaning Guidelines
After each use, wipe your scale gently with a damp cloth. Avoid submerging it in water unless it’s waterproof. Removing crumbs and spills promptly prevents buildup that can interfere with sensors. One baker mentioned that neglecting cleaning once caused skewed readings, leading to a ruined batch of muffins. Regular maintenance preserves accuracy and prolongs the lifespan of the device.
How and When to Calibrate Your Scale
Calibration ensures your scale maintains accuracy over time. Some scales have built-in calibration functions often initiated by placing a known weight on the platform. If your scale doesn’t include this feature, a simple way is to compare it with a known accurate weight, like pre-packaged ingredients with fixed weights, and adjust your technique accordingly. Calibrate your scale every few months or after dropping it. Experienced bakers report recalibrating before major baking sessions, especially when precise outcomes are critical, such as wedding cakes or delicate pastries.
Advanced Tips for Experienced Bakers
Using the Scale for Recipe Adjustments
One advantage of a digital scale is ease in modifying recipes. Suppose you want to double a cookie recipe; weighing ingredients removes math errors common with volume measurements. Calculating ratios—such as hydration levels in bread dough—becomes straightforward, allowing for experimentation with texture and crumb. Experienced bakers also adjust ingredient quantities based on altitude or humidity, using a scale to maintain balance without guesswork.
Converting Measurements and Scaling Recipes
Digital scales often feature the ability to switch units instantly, facilitating conversion between grams, ounces, or milliliters. This is invaluable when using recipes from various countries or cookbooks that differ in measurement styles. Scaling a recipe up or down becomes a precise exercise rather than an estimate, perfect for adjusting portion sizes or adapting to the number of guests. A seasoned baker shared how moving to weight-based scaling eliminated previous issues where halving or doubling ingredients led to inconsistent results, creating a reliable baking process.

