Understanding Chocolate Tempering
The Science Behind Tempering
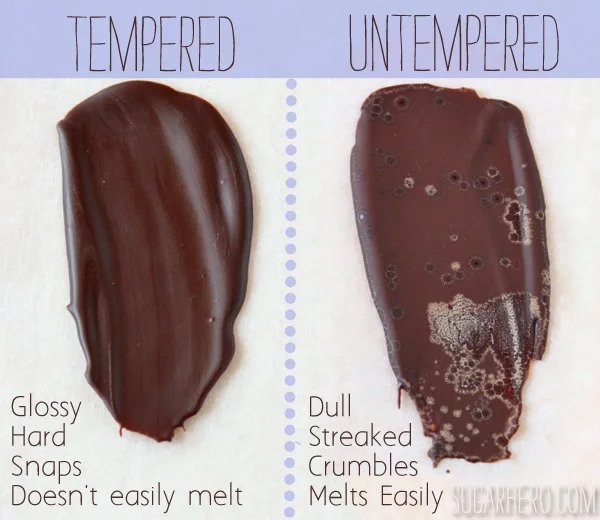
Tempering chocolate involves carefully controlling the temperature to stabilize its fat crystals, specifically cocoa butter. This process ensures that when the chocolate sets, it hardens with a shiny finish and a satisfying snap. Imagine making homemade truffles—if the chocolate isn’t tempered, you might end up with dull, soft pieces that melt too quickly. The science lies in heating, cooling, and then slightly reheating the chocolate to encourage the formation of stable crystals, which give chocolate its ideal texture and appearance.
Why Tempering is Crucial for Candy and Desserts
Properly tempered chocolate is essential for candies and desserts because it improves both the look and durability of your creations. A well-tempered chocolate coating resists melting on your fingers and doesn’t develop a white “bloom” (caused by fat or sugar crystallization). For instance, when crafting homemade chocolate bars or dipped strawberries, tempered chocolate creates a firm, glossy shell that enhances the eating experience and preserves the product longer. Skipping tempering often leads to soft, sticky textures and less appealing finishes.
Types of Chocolate and Their Tempering Needs
Dark Chocolate
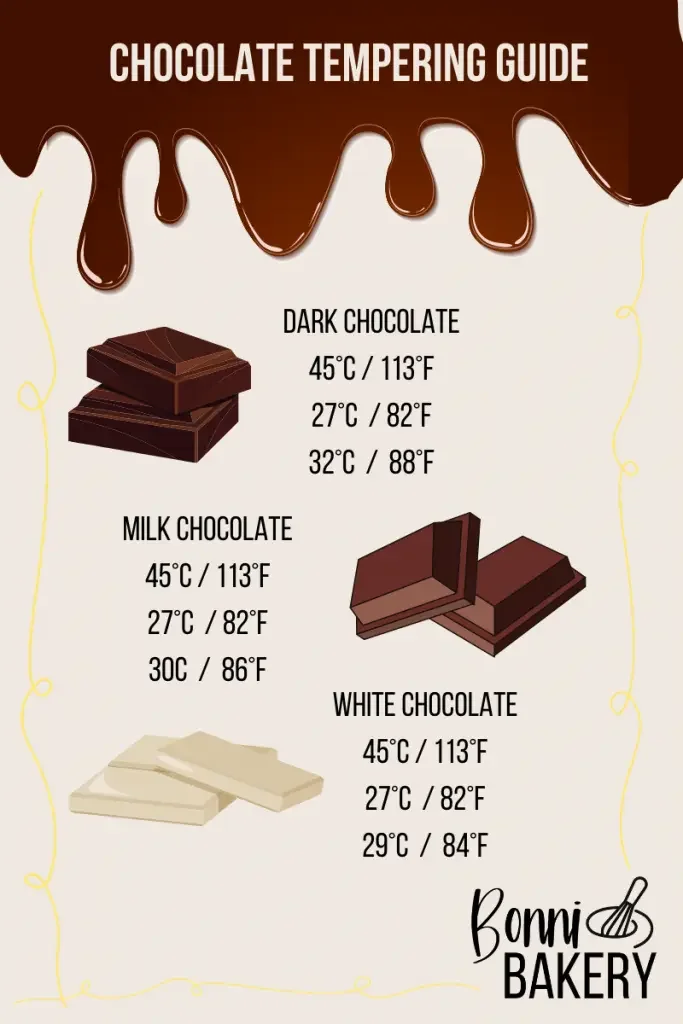
Dark chocolate generally contains higher cocoa solids and less milk, which means it requires a slightly higher temperature for melting and tempering. For example, when making dark chocolate bark with nuts and dried fruit, heating it to about 115°F (46°C) during melting, cooling to around 82°F (28°C), and then gently reheating to 88-90°F (31-32°C) ensures it sets perfectly. Dark chocolate tends to be more forgiving, but precise temperature control still guarantees the best results.
Milk Chocolate
Milk chocolate includes milk solids and sugar, making it more sensitive to heat and prone to burning. When tempering milk chocolate, you need to use slightly lower temperatures than dark chocolate—melting it around 110°F (43°C), cooling to 79°F (26°C), and reheating to 86-88°F (30-31°C). Because milk chocolate has added dairy, it can seize or become grainy if overheated, which is why patience and careful temperature monitoring are essential. A real-life case involved a baker who overheated milk chocolate when making chocolate-covered pretzels, resulting in a dull appearance and soft texture, which tempering could have avoided.
White Chocolate
White chocolate, made from cocoa butter, sugar, and milk solids but no cocoa solids, requires the most delicate handling. Its lower melting point means melting at 105°F (40°C), cooling to 78°F (25°C), and reheating to 82-84°F (28-29°C). White chocolate tempering can be tricky; even slight overheating leads to lumpy or grainy texture. One home candy maker learned this the hard way when their white chocolate drizzle on cakes turned dull and sticky. Tempering white chocolate properly ensures smooth, shiny coatings ideal for decorating.
Step-by-Step Guide to Tempering Chocolate at Home
Preparation and Equipment Needed
Start by gathering essential tools: a heatproof bowl, a reliable digital thermometer, a spatula, and a clean surface for cooling the chocolate. Clean, dry utensils are critical because any moisture can cause chocolate to seize. For example, one novice cook’s chocolate seized when trying to temper in a damp kitchen. Clear your workspace and set out your chopped chocolate or chips for consistent melting.
Melting the Chocolate Correctly
Gently melt two-thirds of your chopped chocolate over a double boiler or in short bursts in the microwave. Stir frequently to prevent scorching and watch your thermometer closely. The key is to reach the temperature specific for your chocolate type without overshooting. For instance, when making holiday chocolate bark, melting slowly while stirring kept the chocolate smooth and glossy.
Cooling and Seeding Methods
The coolest and most straightforward way to temper chocolate is the seeding method. Once melted, stir in the remaining unmelted chocolate to bring down the temperature gradually and encourage stable crystal formation. Spread the chocolate across a cool marble slab or use the bowl’s edges for cooling. This step requires patience; rushing it can disrupt the temper, leaving your chocolate dull and soft. In one home kitchen scenario, a baker tempered chocolate for homemade truffles but skipped the cooling phase, resulting in a sticky finish that wouldn’t harden properly.
Testing the Temper
Before pouring your chocolate onto molds or dipping fruits, test the temper by spreading a small spoonful on parchment. If the chocolate sets within a few minutes at room temperature with a shiny finish and firm snap, the tempering is successful. If it remains sticky or dull, repeat the process. Testing prevents wasted batches and ensures the best finished product, especially important when preparing delicate chocolates for gifts or celebrations.
Common Mistakes and How to Avoid Them
Overheating Chocolate
One of the most frequent errors is overheating chocolate, which breaks down its structure and causes it to seize or become grainy. Always monitor temperature with a digital thermometer and melt slowly. For example, during a baking class, several participants lost batches of chocolate because they reached temperatures beyond those recommended for their chocolate type, leading to wasted ingredients and frustration.
Incorrect Cooling Times
Rushing the cooling step or letting the chocolate cool too much can disrupt the formation of stable crystals. It’s important to cool the chocolate gradually and stir continuously during the seeding process. Inexperience with timing often causes temper failure, resulting in chocolate that doesn’t set correctly or blooms prematurely after cooling. Observing precise times and temperatures improves consistency.
Using Wet Utensils
Even a drop of water can cause chocolate to seize, turning it into a stiff, unusable mass. Always ensure bowls, spatulas, and surfaces are completely dry before starting. One home baker trying to temper chocolate for Easter eggs learned this when a damp spoon ruined a batch, necessitating a restart. Dryness is a simple but crucial detail that can make or break your tempering success.
Creative Uses for Tempered Chocolate in Homemade Treats
Chocolate Shells and Decorations
Tempered chocolate sets beautifully into hard, glossy shells perfect for coating bonbons, truffles, or creating decorative shards for cakes. For example, homemade mousse cakes often feature chocolate decorations that add both visual appeal and textural contrast. Tempering allows these elements to hold their shape and resist melting during serving.
Glazing Cakes and Pastries
A shiny chocolate glaze made from tempered chocolate provides a professional finish to homemade desserts like eclairs, donuts, or layer cakes. One home baker reported that using tempered chocolate glaze improved not only the look but also the snap and mouthfeel of their chocolate-covered pastries, impressing family and guests alike.
Crafting Artisan Chocolate Candies
Tempering is the foundation for making artisan chocolates at home, from filled truffles to molded bars. It ensures the chocolates have a crisp bite and smooth texture that rivals store-bought confections. A chocolatier hobbyist shared that mastering tempering transformed their weekend candy-making from hit-or-miss to reliably impressive treats that kept friends coming back for more.