Understanding Chocolate Tempering: The Basics
What is Tempering and Why It Matters
Tempering chocolate is the process of carefully melting and cooling chocolate to stabilize its crystal structure. This technique is essential for achieving chocolate that sets with a glossy finish, a satisfying snap, and a smooth texture. When chocolate is properly tempered, it also resists melting easily at room temperature, making it ideal for confectionery, decorations, and dipping.
Failing to temper chocolate correctly often results in dull, soft, or blotchy chocolate that lacks the desirable qualities professional chocolatiers strive for. Therefore, understanding tempering isn’t just about aesthetics; it’s about transforming chocolate into a product that’s enjoyable to look at and consume.
The Science Behind Chocolate Crystallization
At the heart of tempering lies the science of cocoa butter crystallization. Cocoa butter can crystallize into several different forms, but only the form known as “Form V” or beta crystals provides the ideal texture and appearance. When chocolate cools too quickly or unevenly, it forms unstable crystals, leading to a grainy texture or bloom (white streaks or spots on the surface).
Tempering involves carefully heating and cooling chocolate to encourage the formation of these stable beta crystals. This controlled crystallization ensures the finished chocolate is shiny, firm, and melts perfectly on the tongue.
Essential Tools and Ingredients for Tempering Chocolate
Choosing the Right Chocolate
Not all chocolate is suitable for tempering. High-quality couverture chocolate is recommended because it contains a higher percentage of cocoa butter, which aids in achieving a smooth temper. Avoid compound chocolates with vegetable fats, as they do not temper properly and typically yield inferior results.
Look for chocolate specifically labeled for tempering or couverture chocolate. The higher fat content and purity give you more control during the tempering process.
Must-Have Equipment for a Smooth Process
Successful tempering requires certain tools to regulate temperature precisely. A heatproof bowl and a sturdy spatula are basic essentials for stirring and melting chocolate. Employing a double boiler or a microwave with controlled bursts will help you avoid overheating.
One indispensable tool is a reliable chocolate thermometer, which allows you to track the crucial temperature changes during melting and cooling phases. Without accurate temperature measurement, it’s easy to overheat or undercool the chocolate, resulting in poor temper.
Step-by-Step Guide to Tempering Chocolate Manually
Melting the Chocolate Correctly
Begin by chopping chocolate into small, uniform pieces to promote even melting. Gently melt two-thirds of the chocolate over a double boiler or in short bursts in a microwave, stirring frequently. The goal is to reach a temperature between 110°F to 115°F (43°C to 46°C) for dark chocolate, slightly lower for milk and white varieties, to fully melt the fat crystals without burning.
Once melted, it’s essential to remove the bowl from heat before the temperature rises further, as overheating can scorch the chocolate and ruin its temper.
Cooling and Reheating: Achieving the Perfect Temperature
Next, gradually cool the melted chocolate by adding the remaining one-third of unmelted chopped chocolate, stirring continuously. This process, known as “seeding,” lowers the temperature and introduces stable crystals into the mixture.
When the chocolate cools to about 82°F (28°C) for dark chocolate, gently reheat it to the working temperature of 88°F to 90°F (31°C to 32°C). This final heating phase melts unstable crystals but preserves the desired stable ones, preparing the chocolate for use.
Testing Chocolate for Tempering Perfection
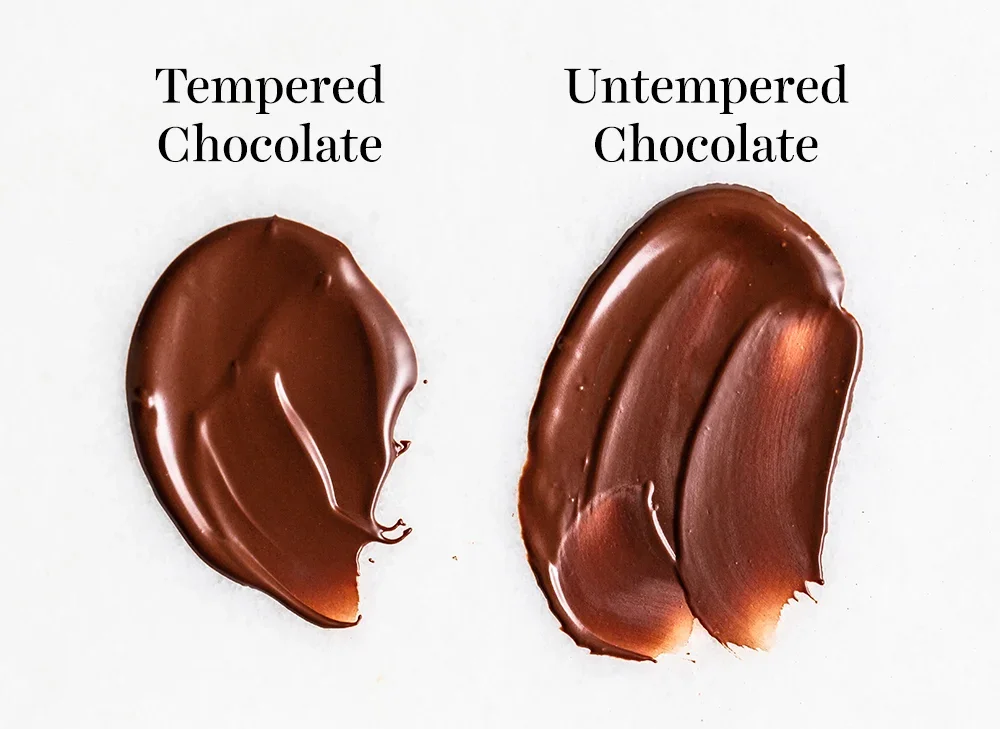
Before using tempered chocolate, test its readiness by smearing a small amount onto a piece of parchment or the edge of a countertop. If it sets quickly within a few minutes, appears glossy, and snaps when broken, the tempering was successful.
If it remains soft, sticky, or dull, the chocolate may need further tempering. Continue stirring gently while cooling or reheating in short bursts to adjust the crystal structure.
Common Mistakes That Cause Chocolate to Seize and How to Avoid Them
Understanding Seizing and Its Causes
Chocolate seizing refers to the transformation of smooth, melted chocolate into a thick, grainy mass. This often occurs when small amounts of water come into contact with chocolate during melting. Even a few drops can cause the sugar to crystallize prematurely, ruining the texture.
Other causes include overheating or excessively aggressive stirring, which can disrupt the cocoa butter’s delicate structure.
Quick Fixes for Seized Chocolate

If chocolate seizes, it’s sometimes salvageable by gently adding warm cream or butter, stirring slowly to restore smoothness. This effectively turns the mixture into a ganache-style sauce, which works well as a frosting or filling. However, once chocolate has seized, it is no longer suitable for tempering and setting into a firm shell.
Prevention is the best strategy: always ensure your equipment and utensils are completely dry before beginning and avoid introducing moisture during the melting process.
Alternative Techniques: Tempering Chocolate Without a Thermometer
Visual and Textural Cues to Guide You
While a thermometer is the most reliable tool, experienced cooks can temper chocolate by relying on visual and textural hints. Notice that fully melted chocolate is smooth and glossy, with no lumps. When cooled properly, it will thicken slightly and feel warm but not hot to the touch.
Testing chocolate by spreading it thinly on parchment and observing how it hardens can also indicate readiness. A well-tempered chocolate will set uniformly with a shiny finish and firm snap, whereas untempered chocolate will look dull and set unevenly.
Storing and Using Tempered Chocolate at Home
Best Practices to Maintain Shine and Snap
Tempered chocolate should be stored in a cool, dry place away from strong odors, as chocolate easily absorbs surrounding scents. Avoid refrigeration if possible, as condensation can cause blooming. Keep it at a consistent temperature below 70°F (21°C) for optimal preservation.
When ready to use, handle tempered chocolate gently to maintain its crystal structure. Once cooled and set, tempered chocolate is excellent for molding, dipping fruits or nuts, or assembling elegant desserts that impress both visually and texturally.
Bonus Tips: Enhancing Your Tempering Skills for Advanced Recipes
Once comfortable with basic tempering, experiment with adding flavors or tempering larger batches. Using a marble slab to cool and work the chocolate manually can offer finer control over the texture. Additionally, adjust temperatures slightly for different types of chocolate, such as milk or white, which crystallize at lower temperatures.
Patience is key—temper chocolate slowly, avoid rushing steps, and always keep your tools dry and your workspace clean. With practice, tempering chocolate will become a rewarding skill that elevates your homemade confections to professional quality.

