Understanding Chocolate Tempering: The Basics
What Is Chocolate Tempering?
Tempering chocolate is a culinary technique used to heat and cool chocolate to stabilize it for making candies and baked goods. Unlike simply melting chocolate, tempering involves carefully controlling the temperature to achieve a glossy finish, a firm snap, and a smooth texture. Imagine preparing chocolate for dipping strawberries or creating elegant decorations for cakes — tempering is what gives that professional and appetizing appearance.

Why Temper Chocolate for Baking?
When you bake or create confections, the texture and appearance of chocolate play a critical role. Untempered chocolate can become dull, soft, or develop white streaks called bloom as the cocoa butter separates. Tempered chocolate, however, hardens uniformly with a shiny coat that resists melting too quickly in your hands. This makes it perfect for coating desserts, molding shapes, or adding crisp texture to baked goods. For example, a baker preparing chocolate-covered truffles relies on tempering to ensure the chocolate shell has that irresistible snap.
The Science Behind Tempering
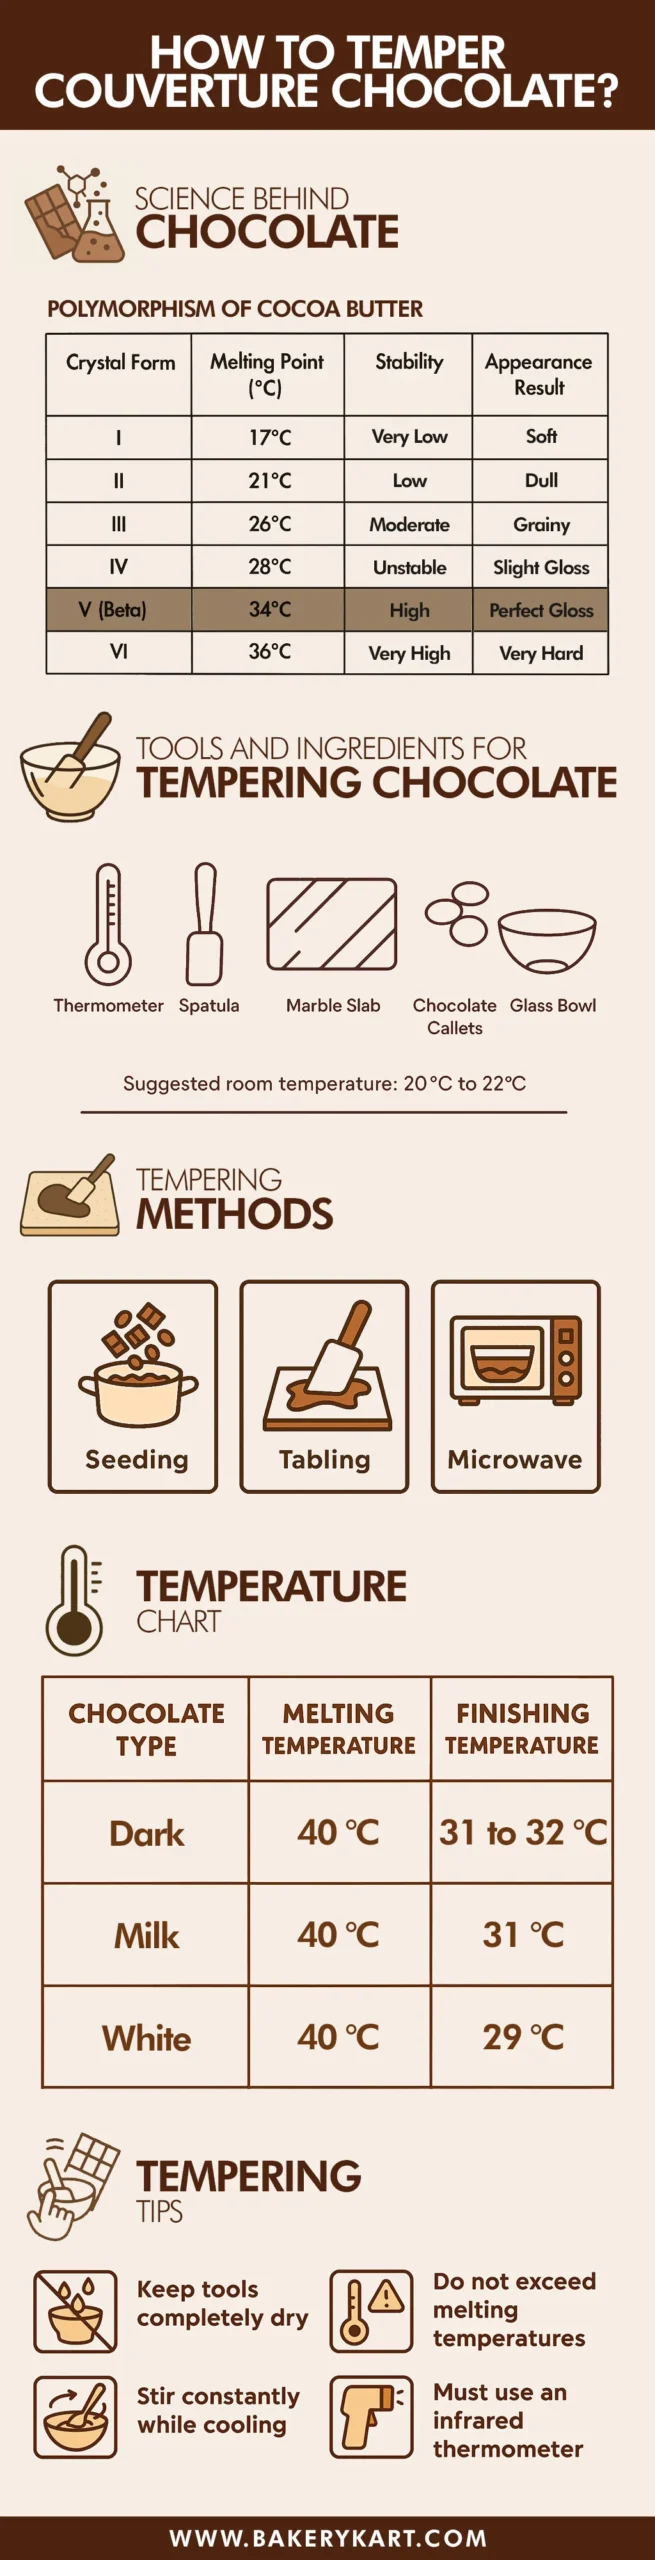
At its core, tempering manipulates the crystal structure of cocoa butter within the chocolate. Cocoa butter can form several types of crystals, but only one — the beta crystal — provides the desirable qualities. By heating and cooling chocolate in specific temperature ranges, you encourage these stable crystals to form. This process ensures that the chocolate solidifies with strength, gloss, and a pleasant mouthfeel. Without tempering, the chocolate forms unstable crystals leading to a dull finish and soft texture.
Essential Tools and Ingredients Needed
Types of Chocolate Suitable for Tempering
Not all chocolates temper equally. High-quality couverture chocolate, which contains a higher percentage of cocoa butter, is your best bet. This type melts smoothly and responds well to tempering. Semi-sweet, bittersweet, and dark chocolates usually temper well, while milk and white chocolates require more precision because of their lower cocoa solids and higher dairy content. Bakers often choose couverture chocolate for its superior flavor and tempering performance, especially when crafting fine decorations or coatings.
Recommended Equipment: Thermometers, Bowls, and More
Precision is vital in tempering, and the right tools simplify the process. A good digital or candy thermometer is indispensable to monitor exact temperatures. Glass or stainless steel bowls work best because they distribute heat evenly. You also need a heat source, such as a double boiler or a microwave-safe container. Some bakers invest in marble slabs for the traditional tabling method, while others prefer silicone spatulas for stirring. Having clean, dry equipment is equally important to prevent chocolate from seizing, a common frustration in home kitchens.
Step-by-Step Process: How to Temper Chocolate Correctly
Step 1: Preparing the Chocolate
Start by chopping your chocolate into small, uniform pieces. This ensures even melting. Place about two-thirds of the chocolate in your bowl and set aside the rest for later. If you’re using a microwave, opt for a medium power setting to avoid overheating. At this stage, patience is essential—rushing can result in uneven temperature distribution, setting you up for tempering failure.
Step 2: Melting to the Right Temperature
Using a double boiler or microwave, heat the chocolate while continuously stirring to prevent scorching. Dark chocolate should reach about 115°F to 120°F (46°C to 49°C), while milk and white chocolates require slightly lower temperatures, around 110°F (43°C). Monitoring this step is crucial: overshooting the heat can ruin the chocolate’s temper. Samantha, a home baker, learned this the hard way after accidentally boiling her chocolate and ending up with grainy lumps.
Step 3: Cooling and Crystallizing
Remove your bowl from heat and begin cooling the chocolate by stirring constantly. Add the reserved one-third of chopped chocolate gradually, encouraging the formation of stable crystals. Cool the chocolate to approximately 82°F (28°C) for dark chocolate or slightly less for milk and white. This crystallization phase is the heart of tempering and requires consistent agitation to transform molten chocolate into a glossy, stable state.
Step 4: Reheating to Working Temperature
Once cooled, gently reheat the chocolate to its working temperature—about 88°F to 90°F (31°C to 32°C) for dark chocolate and a little lower for white or milk varieties. This warms the chocolate enough to be workable but keeps the stable crystals intact. At this point, the chocolate is ready for use in dipping, molding, or decorating. Timing matters here; if you wait too long, the chocolate will thicken and may need reheating carefully.
Step 5: Testing the Temper
To verify temper, smear a small amount onto parchment paper or the edge of a countertop. Properly tempered chocolate will harden within a few minutes with a shiny finish and snap when broken. If it remains sticky, dull, or soft, the tempering process needs adjustment. Many chocolatiers perform this quick test repeatedly to ensure consistency before starting large batches.
Troubleshooting Common Tempering Issues
Signs of Improper Tempering
Recognizing when tempering has gone wrong saves time and ingredients. Common signs include dull or matte finish, soft or crumbly texture, and white streaks or spots known as bloom. These defects not only affect appearance but also the shelf life and flavor perception of your finished product. For example, a chocolate ganache covered in untempered chocolate may look uneven and feel waxy.
How to Fix Seized or Grainy Chocolate
Seizing happens when a few drops of water mix with melted chocolate, causing it to clump into grainy masses. To rescue seized chocolate, try adding a small amount of warm vegetable oil or cocoa butter and stirring vigorously. While this can smooth it out for some applications, such as sauces, it may not work well if you need to temper it again. Prevention is best—ensure all tools are dry and avoid steam from double boilers touching the chocolate.
Alternative Tempering Methods to Try
Seeding Method Explained
The seeding method is popular among home bakers for its simplicity. After melting most of the chocolate to the target high temperature, you add solid pieces of unmelted chocolate to the bowl. This “seed” encourages the formation of stable crystals as the temperature lowers. Regular stirring combines melted and solid chocolate until the mixture reaches the ideal crystallization temperature, streamlining the process without specialized equipment.
Tabling Method Overview
For advanced chocolatiers, the tabling method offers precise control. This involves pouring melted chocolate onto a cool marble slab and spreading it with spatulas to cool it down while continuously working it. Once the chocolate starts to thicken and crystallize, it is scraped back into the bowl and gently warmed to the working temperature. The result is perfectly tempered chocolate with a glossy shine and firm texture, though it requires skill and practice.
Microwave Tempering Technique
Microwave tempering is the fastest but riskiest method for beginners. It involves short bursts of heating interspersed with stirring, adjusting power levels to avoid overheating. This method is convenient for small batches or when tools are limited but demands close attention. Improper microwave tempering often leads to burnt chocolate or improper crystallization, so consistent temperature checks are a must.
Practical Applications of Tempered Chocolate in Baking
Tempered Chocolate for Coating and Decorations
Tempered chocolate shines when used as a coating for candies, fruits, and baked treats. Its hard, glossy shell provides a pleasant contrast to soft centers. Pastry chefs often dip cake pops or freshly made truffles into tempered chocolate to create a visually appealing and structurally sound finish. Decorations like curls, shards, or intricate shapes rely on tempered chocolate’s stability to hold form and texture.
Creating Chocolate Molds and Shapes
Tempering is essential when pouring chocolate into molds for making chocolates or decorative pieces. Properly tempered chocolate sets firmly and releases cleanly from molds without cracking or melting too quickly. For example, a chocolatier crafting holiday-themed molds depends on tempering to ensure each piece maintains its shape and glossy appearance, delighting customers with every bite.
Incorporating Tempered Chocolate into Recipes
Beyond decorations, tempered chocolate can be folded into mousses, ganaches, or layered desserts to add crunch and shine. Bakers may use tempered shards to garnish classic cakes or pastries, adding texture contrast and visual elegance. Even in cookies or brownies, tempered chocolate decorations elevate the overall presentation and eating experience, turning homemade treats into professional-quality delights.